


Assumptions
This User Guide is written with the assumption that you are familiar with cameras, computers (PCs), and image enhancement software. This Guide provides information on the use of the Kepler Imaging System.
This Guide describes the standard System components. If you have received custom or optional items, they are not described in the main sections of this Guide. Information for special items may be provided in an Appendix or as separate documentation.
Check your Shipment
Ensure that all the components have arrived safely and that all the items you ordered were properly delivered to you. In the unlikely event of a missing or damaged component, immediately notify your FLI dealer or FLI.
A camera order should include the following items:
Note: Save the shipping materials that minimize shock and vibration in the event that you need to return the camera.
Camera Care and Safety
WARNING: Kepler Imaging System is shipped with a 12-volt grounded power supply. Do not use any other power supply with this System or use the power supply in a way other than described in this Guide as it may cause damage to the camera that will not be covered under the warranty.
WARNING: If any liquid spills into the camera, immediately remove the power cord from the wall outlet and remove the power supply cable from the camera. Use a dry cloth to absorb the liquid. DO NOT USE the camera as it may cause personal HARM or damage the camera. Contact FLI for further information and instructions.
Review the information below. Failure to heed these suggestions may damage to the camera or may adversely affect its operation.
Installing FLI Software
Note: If your system contains an earlier version of the FLI Software, uninstall / remove it by following the onscreen prompts. Then install the most current version. Overwriting an old file is not recommended.
Your computer must run Windows XP/Vista/7/8/8.1/10 32-bit or 64-bit. (If you do not know your system type, it is typically available from the Control Panel / System and Security / System menu.)
As noted in the camera shipping box, go to the "Support" tab of the FLI website. Select the FLI Software Installation Kit corresponding to your computer type. The Installation Kit installs FLI's applications and USB device drivers. Also, download the ASCOM driver for the focuser products if appropriate. Follow the onscreen prompts for the installation instructions.
After installing FLIPilot, click on the FLIPilot icon to launch it and ensure it has been installed.
Confirming Driver Installation
You can determine if the camera drivers have been properly installed after connecting and powering the camera. The procedure below is typical of most operating systems; however, it may be slightly different on your computer.
Third Party Software
Kepler cameras are supported by a robust SDK (Windows, LINUX) free of charge. Also included is FLI Pilot software. MATLAB®, LabVIEW®, ASCOM and μManager are fully supported.
Input-output TTL signals via an eight pin AUX port are provided making it easy to synchronize the camera’s operation with external events or light sources.
Before acquiring software to control your camera we strongly advise you to check with the software vendor and contact FLI. New releases of software may differ in functionality from previous versions of the same software and not operate as expected.
Image capture and analysis software includes:
Setting up and Powering Your System
Assemble all system components in one area before beginning this set up procedure.
Note: Run the FLI Software Installation Kit before you set up and power your system to ensure the system recognizes and correctly initializes the camera.
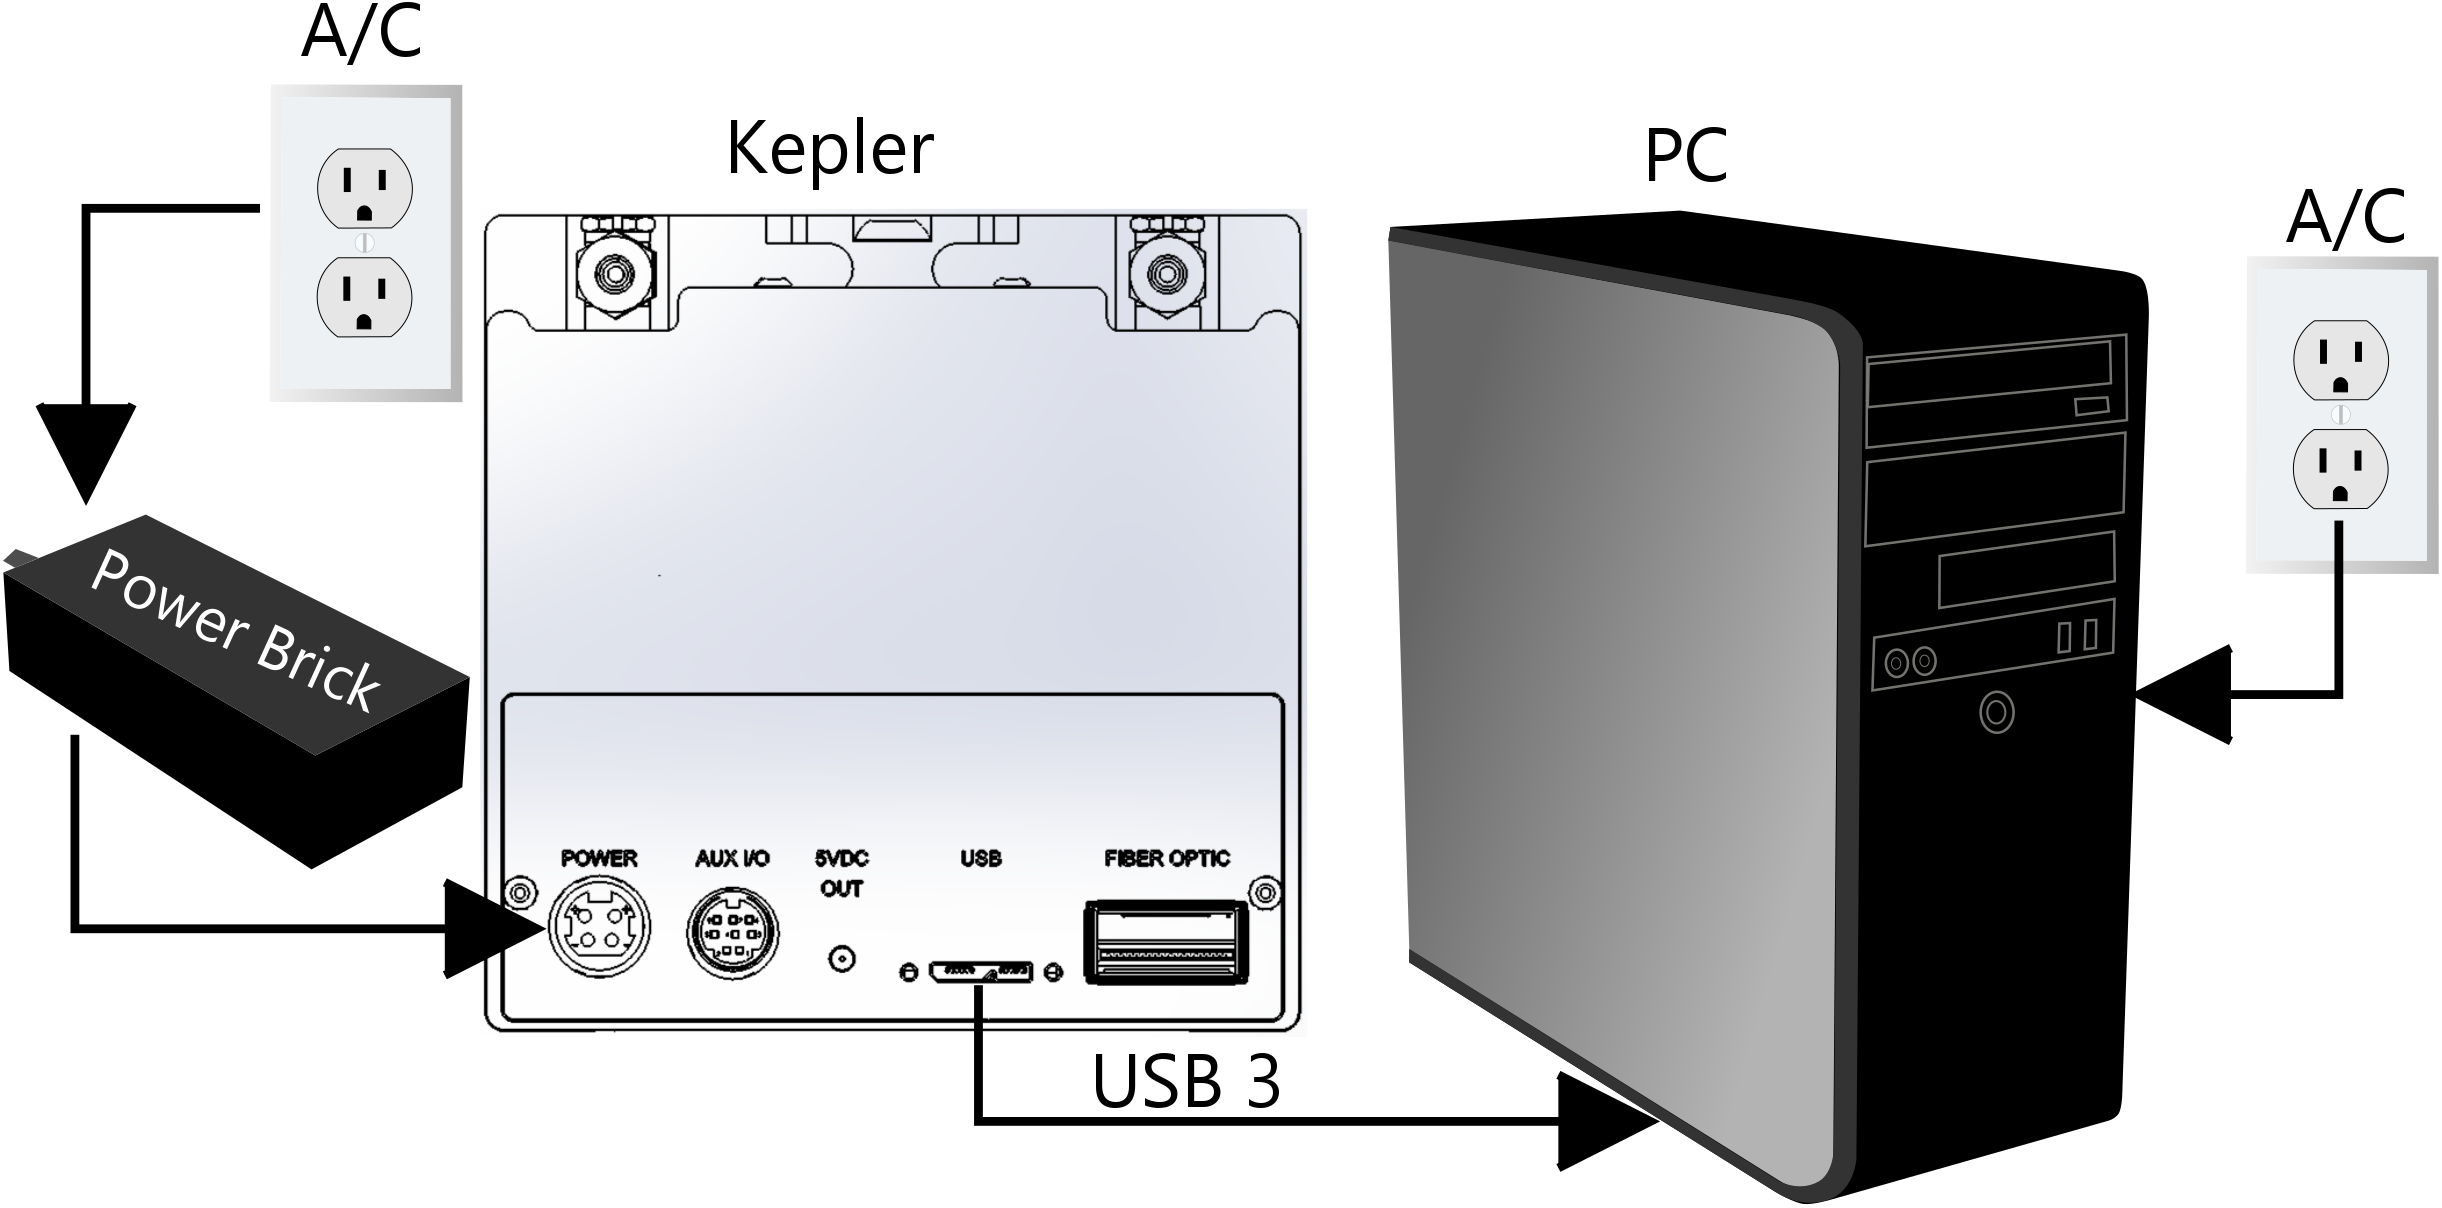
Figure 1 shows the camera with the appropriate connections made.
Set up the system as described in the steps below.
Sensor Temperature / Cooling Information
The standard Kepler camera configuration provides for sensor air cooling (un-cooled). Depending on your application, you camera sensor may require cooling with air or with liquid coolant.
The Kepler family of cameras, like all FLI cameras, have a built-in TEC (Peltier) and a fan that enables the camera to cool the sensor. Removing excess heat from the camera’s electronics and keeping the sensor cool keeps the dark current to an acceptable minimum and reduces drift when capturing multiple frames. Provide clearance on the air intake/output faces of the camera.
The fan power is set at the factory. Refer to the FLIPilot documentation for information on controlling the fan.
Two heater strips on the outside of the camera window keep the window just above ambient temperature to reduce condensation on the window. Refer to the FLIPilot documentation for information on controlling the heater.
If your application requires liquid cooling, refer to Table 1 for connectors for the ports on the camera. The actual cooling for any given camera will depend on the sensor size and ambient temperatures. The Liquid Cooler can accept a flow rate up to 0.5 gallon/minute (1.91 liter/ min).
Note: The Maximum Liquid Cooler inlet pressure is 50 psig. Ensure the tubing has the proper pressure rating. To avoid undesired pressure build up in Liquid Cooler shut off flow on the inlet side before detaching or closing outlet connections.
WARNING: Using liquid cooling flow rates above the recommended flow rates may cause the liquid cooling system to leak and will void the warranty.
Table 1. Connectors
External Triggering and/or Exposure Control
Externally trigger the camera using FLI Pilot as described in the steps below.
•
Camera with shutter cover installed (save this cover)
•
Camera Test Report / FLI Quality Assurance Test Summary
•
USB cable
•
12 volt power supply
•
Packing list
•
FLI Software Installation and Documentation (one page)
•
The camera contains no user serviceable components.
•
As a general safety precaution, remove liquids and all unnecessary items from the area in which the camera will be used.
•
Provide adequate clearance (2.5 inches (6 cm)) on the camera’s intake and exhaust sides for air flow.
•
For USB 3 Systems, directly connect the computer and camera power supply to standard grounded electrical power outlets (the same service).
•
Plug the power cord into the camera first, then plug the power cord into the power outlet.
•
When not in use eliminate damage to the camera from electrical surges (for example, lightning strikes) by unplugging both the camera power supply from power and the camera USB cable from the computer.
•
Before connecting and disconnecting any cables, shut down the computer. Failure to do so may result in damage to the camera.
•
The site should not have excessive dust. Use a dust cover to protect the camera when not in use.
•
If the fins of the camera’s fan contain debris, use a cotton swab to remove debris.
•
The room temperature and humidity should provide adequate operator comfort. High or low temperatures and humidity may adversely affect the camera.
•
Dispose of the camera according to national guidelines.
1.
Choose the Control Panel from the start menu.
2.
Choose System Properties.
3.
Select the Hardware tab and select Device Manager.
4.
Click the (+) next to Universal Serial Bus Controllers.
5.
If the FLI Camera is displayed, the drivers are correctly installed.
6.
Right Click on FLI Camera, choose Properties to view the driver status, driver date, etc. If the driver does not show up, uninstall FLIPilot then re-install it.
•
SkyX from Software Bisque (www.bisque.com)
•
MaximDL from Diffraction Ltd (www.cyanogen.com)
•
Astroart from MSB software that has a multi-lingual interface (www.msb-astroart.com)
1.
Run the FLI Installation Kit to install the software as described previously.
2.
Attach the USB cable between the camera and your computer.
3.
Connect the 12-volt power supply between the camera’s 4-pin “DC Power Jack” connector and a wall socket or switched AC power strip. The camera’s fans will start running. Your computer should display a screen indicating that the system has found new hardware. If it has not, refer to “Confirming Driver Configuration” earlier in this Guide.
| Connector | Standard User Interface | Additional Information | |
| 1/8” ID Hose Barb | 1/8” ID Tubing | FLI recommends use of hose clamps. User supplies tubing and clamps with appropriate pressure rating for their application. | |
| Quick Connect Double Shutoff | #10-32 UNC male coupling | FLI supplies both female and male connectors. User supplies the interface. | |
| Quick Connect Dry Break | #10-32 UNC male coupling | FLI supplies both female and male connectors. User supplies the interface. | |
| Custom | Per Customer Requirements | FLI is able to plumb to interfaces not listed. Please contact FLI with your connection requests. | |
1.
In FLI Pilot select the Shutter Control.
2.
Select how the triggering is setup on the pull down menu:
“External trigger on LOW” for low edge triggering (transition from +3.3V to 0V or equivalent LVTTL signal ) on AUX pin 5.
“External trigger on HIGH” for high edge triggering (transition from 0V to +3.3V or equivalent LVTTL signal ) on AUX pin 5
“External trigger on LOW” for low edge triggering (transition from +3.3V to 0V or equivalent LVTTL signal ) on AUX pin 5.
“External trigger on HIGH” for high edge triggering (transition from 0V to +3.3V or equivalent LVTTL signal ) on AUX pin 5
3.
Select “Done”.
4.
Open the Grab Control.
5.
Select desired frame and exposure settings.
6.
Click the Grab button. The camera will now wait for an external trigger.
- Introduction
- Operation
- Assumptions
- Conventions
- Additional Information
- Accessproes amd Ordering Information
- Warranty and Return Procedure Specifications
- Kepler Imaging System Overview
- Check Your Shipment
- Camera Care and Safety
- Instaling the FLI Software Installation Kit
- Confirming Driver Installation
- Third Party Software
- Setting Up and Powering Your System
- Sensor Temperature Information
- External Triggering
- Hardware
- Troubleshooting & Specifications
- Exposure & Triggering Guide

Finger Lakes Instrumentation, a division of IDEX Health & Science LLC
1250 Rochester St.
Lima, New York 14485
1250 Rochester St.
Lima, New York 14485
Phone: 585-624-3760
Email: IHSKeplerSupport@IdexCorp.com
Web: www.flicamera.com
Email: IHSKeplerSupport@IdexCorp.com
Web: www.flicamera.com
©2023 IDEX Health & Science LLC
Set up the system as described in the steps below.
Figure 1. Kepler Camera with System Connections
Specifications regarding the power supply and power cable of the Kepler cameras is in the page PT1.
The option to electrically isolate your Kepler is available. See System Isolation
The option to electrically isolate your Kepler is available. See System Isolation

Note: If your system runs with two GPU's (an internal GPU and a dedicated GPU), you should follow the instructions here to assure that the dedicated GPU is configured as the primary GPU for all Pilot calculations and processes.


The firmware of each camera can be updated if problems arise with its behavior. The process is well documented on the Firmware Updates page.
It is important to make backups prior to preforming updates to avoid losing data or functionality.
It is important to make backups prior to preforming updates to avoid losing data or functionality.

Firmware Updates
User Guide available at https://www.flicamera.com/software/index.html