


Kepler Triggering
Kepler Exposure Start Options
Kepler Image to Image Timing
Kepler cameras support internal and external ways of triggering (commencing exposure) an image. When an image frame is required, the user interface can command a trigger. All trigger commands are executed after the Exposure Delay time has expired This approach makes computer control of when an image is captured easy.
The triggering options can be modified in FLI Pilot under Trigger.
Trigger Options:
Internal: This method uses the software application to issue a trigger request immediately when a capture is requested. This internal trigger is communicated over the USB 3.0 connection or Optical Fiber connection (See System Isolation). These connections introduce a small amount of variable delay. There is also a fixed delay in the camera for the internal trigger to be communicated to the sensor controller.
External Low to High and External High to Low: This method configures the sensor to respond to an external trigger. This input is found on the 8-pin connector, Pin 3. When an external trigger is selected and image capture is requested, the camera waits for the transition of the external trigger pin to start the exposure. With Low to High selected, the camera waits from the signal on Pin 3 to transition from Low to High. With High to Low, the camera waits for a High to Low transition.
External Control High to Low and External Control Low to High: In these modes of operation, the level of the externally supplied trigger signal (provided through Pin 3) controls the start of the image exposure and the end of the exposure. For control high to low, the image exposure starts when the external trigger input transitions from high state to low state and ends when the external trigger input transitions from low state to high state. For control low to high the external trigger states are the reverse. The exposure value entered in the software acts as a maximum exposure. If the external trigger state is still active when the entered maximum exposure is reached the exposure is halted and readout begins. Therefore, ensure the entered exposure setting value is larger than the maximum expected externally controlled exposure time.
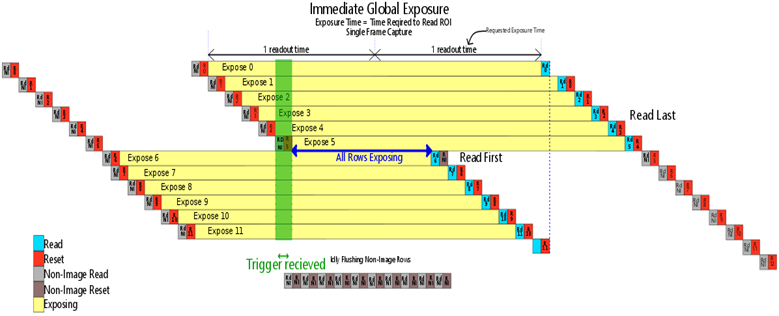
Immediate Global Exposure
In immediate global exposure mode, the trigger is received and all row resets cease immediately and all rows are exposing. Therefore, all rows are exposing at the same time without read and reset interruptions.
This prevents a 21/42ms variability that the first row exposure has. However, there still exists a small delay of at most 21usec due to the previously mention time required to complete an active read/reset function. Additionally, there will exist rows with up to 21 msec of exposure which has already occurred due to rows that had not been reset since the previous flush procedure. This is only an issue if the sensor has been exposed to light during the time immediately prior to the trigger. A well functioning shutter or a dark scene with a flash allow this mode to function best.
When the start row has reached the desired exposure duration, image row readout commences and continues for 21/42 usec. In Figure 3, for example, row 6 is read first due to the timing of the received trigger. When it reaches row 11, readout loops back to row 0 and continues until row 5, which is the last row to be read. This results in all rows having slightly different exposures, but this is not deemed a problem due to the nature of the image being captured.
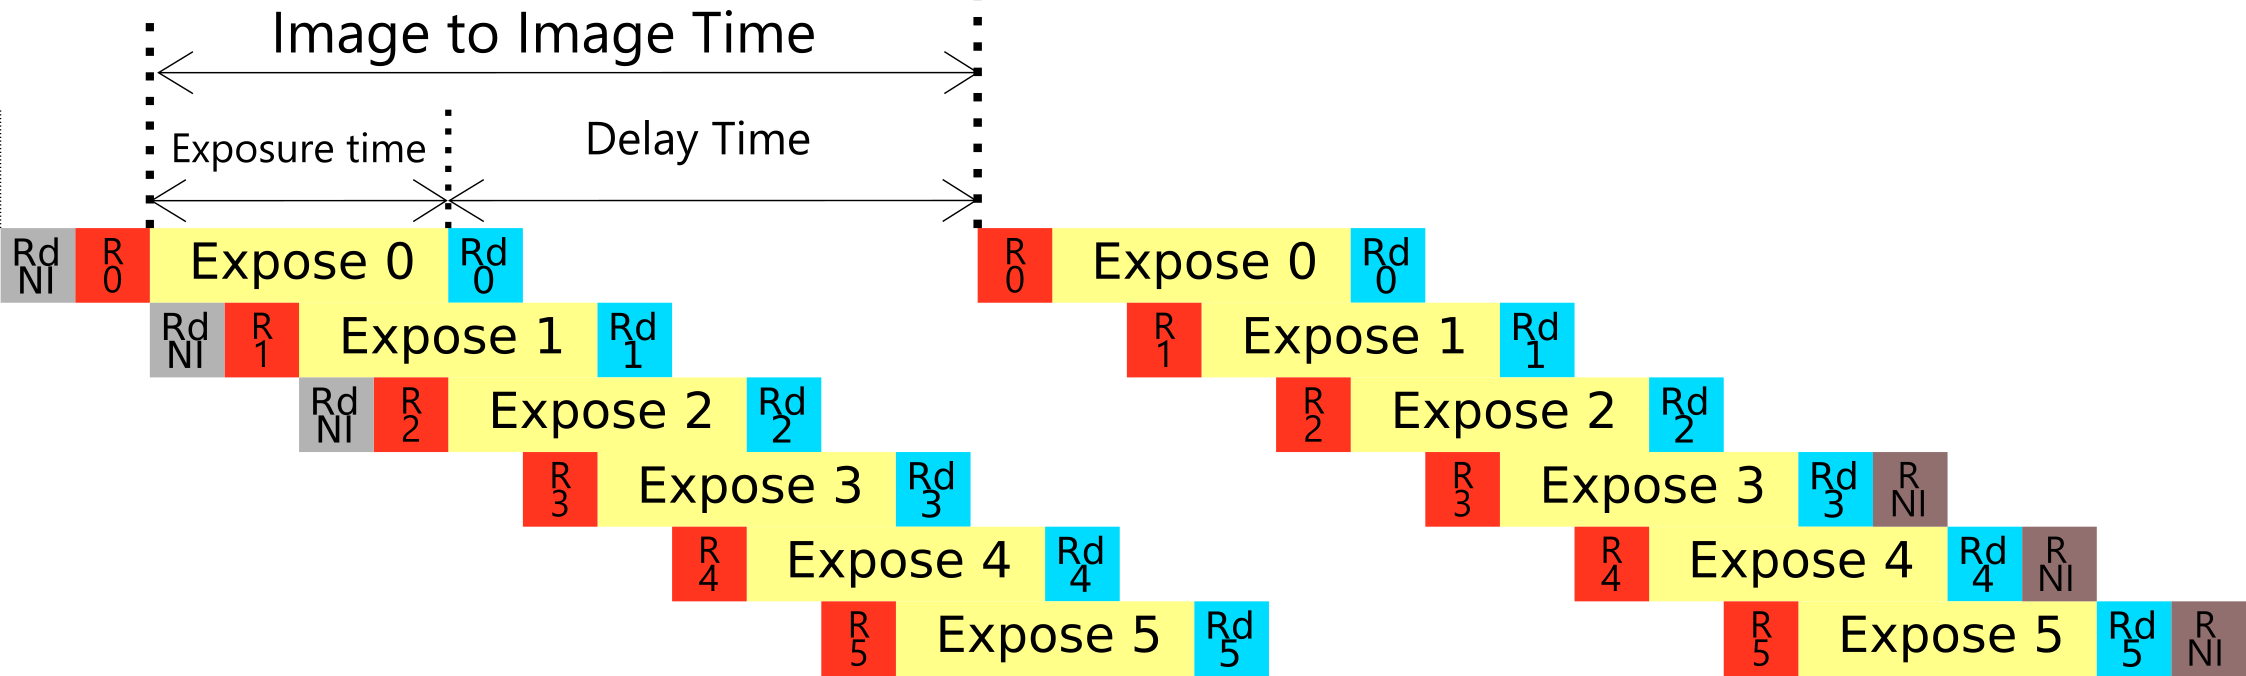
Kepler camera Image to Image timing can be controlled when you are running multiple images or continuous images. Image to Image time consists of exposure time and delay between end of exposure and start of next exposure. Kepler cameras lets you set exposure time and image to image time.
The FLI Pilot interface allows you to define any two parameters and automatically calculates the third parameter of the equation:
Figure 4. Image to Image Timing
Kepler cameras use a sensor that is a rolling shutter imager.
The pixels in the array are always exposed to light.
A single row within the sensor consists of a three step sequence.
The sequence starts with discarding built up charge, known as a reset or flush, to bring each pixels charge back to the reference level. When a reset is finished, the pixels in that row begin absorbing light (exposing) which accumulates charge. Finally, after the row is done exposing, the built up charge is read, known as readout. (Figure 1)
More information regarding rolling shutter imaging can be viewed here.
Figure 1. Single Row Sequence
Figure 2: First Row Exposure. Six row example.
Kepler Camera Modes
The KL400 has four camera modes:
•Rolling LDR
•Rolling LDR-LDC
•Rolling HDR
•Rolling HDR-LDC
The KL4040 has one camera modes:
•Rolling HDR-LDC
Rolling LDR:
LDR (Low Dynamic Range) mode captures a single 12 bit image. This mode consists of 0 to 4,095 counts, but
offers high frame rates compared to HDR.
LDR mode is useful for short and bright exposures.
Rolling LDR-LDC:
LDR-LDC (Low Dynamic Range-Low Dark Current) mode is similar to LDR mode. The difference is that LDC
leads to less electrons accumulating in pixels when not exposed to light. This results to a smaller full well
capacity, but allows for less dark current growth in long exposure images.
Rolling HDR:
HDR (High Dynamic Range) mode captures two images, a high gain and low gain image. In this mode you can
view either gain image, or a merged image of the two, which creates a 16 bit image. HDR has slower frame
rates than LDR, but is more sensitive and detailed with 0 to 65,535 counts.
Rolling HDR-LDC:
HDR-LDC (High Dynamic Range-Low Dark Current) mode is similar to HDR mode. The difference is that LDC
leads to less electrons accumulating in pixels when not exposed to light. This results to a smaller full well
capacity, but allows for less dark current growth in long exposure images.
Figure 3. Immediate Global Exposure

Finger Lakes Instrumentation, a division of IDEX Health & Science LLC
1250 Rochester St.
Lima, New York 14485
1250 Rochester St.
Lima, New York 14485
Phone: 585-624-3760
Email: IHSKeplerSupport@IdexCorp.com
Web: www.flicamera.com
Email: IHSKeplerSupport@IdexCorp.com
Web: www.flicamera.com
©2023 IDEX Health & Science LLC
The Exposure start options are controlled in FLI Pilot under Trigger.
First Row Exposure (Default Exposure Setting)
In first row exposure mode, the trigger may be received at any time during the sensor's idling, however, the sensor will always finish its active cycle of flushing before beginning exposure. Where in this process the trigger was received is unknown, thus, there is a variable delay of between 0 and 21msec.
When an exposure starts, the camera resets the start row and commences exposure as soon as the trigger is received. In this case, no charge that was accumulated in the exposure prior to the trigger is kept since all image rows are reset after the trigger. This results in a start of exposure time difference for each image row. For most imaging applications this is acceptable.
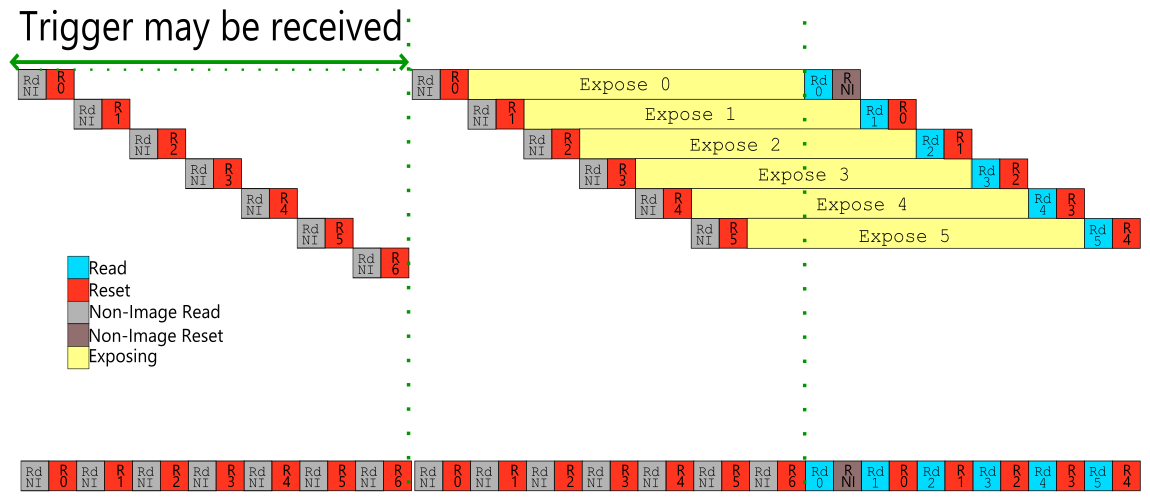
Image to Image Time = Exposure Time + Delay Time
When a physical shutter is in use with a Kepler camera, there is an automatic Shutter Open Delay (SD) that delays the beginning of an exposure by a certain amount each time an external trigger is received. Additionally, a Shutter Close Delay can be implemented to close the shutter prior to the end of exposure or to postpone the following capture. If these features are needed, contact FLI to configure the options for your system.
Figure 5 shows the process clearly. Upon receiving a trigger pulse (T), the shutter open delay begins and the shutter opens. Upon the end of the shutter open delay, exposure of the frame begins. As mentioned, a shutter close delay (SCD) is also possible to implement. Figure 6 shows the difference between a positive and negative shutter close delay. A negative SCD will command the shutter to close the entered duration prior to exposure ending. A positive SCD will command the shutter to close when exposure ends and prevent the next image to begin capture until after the set duration.

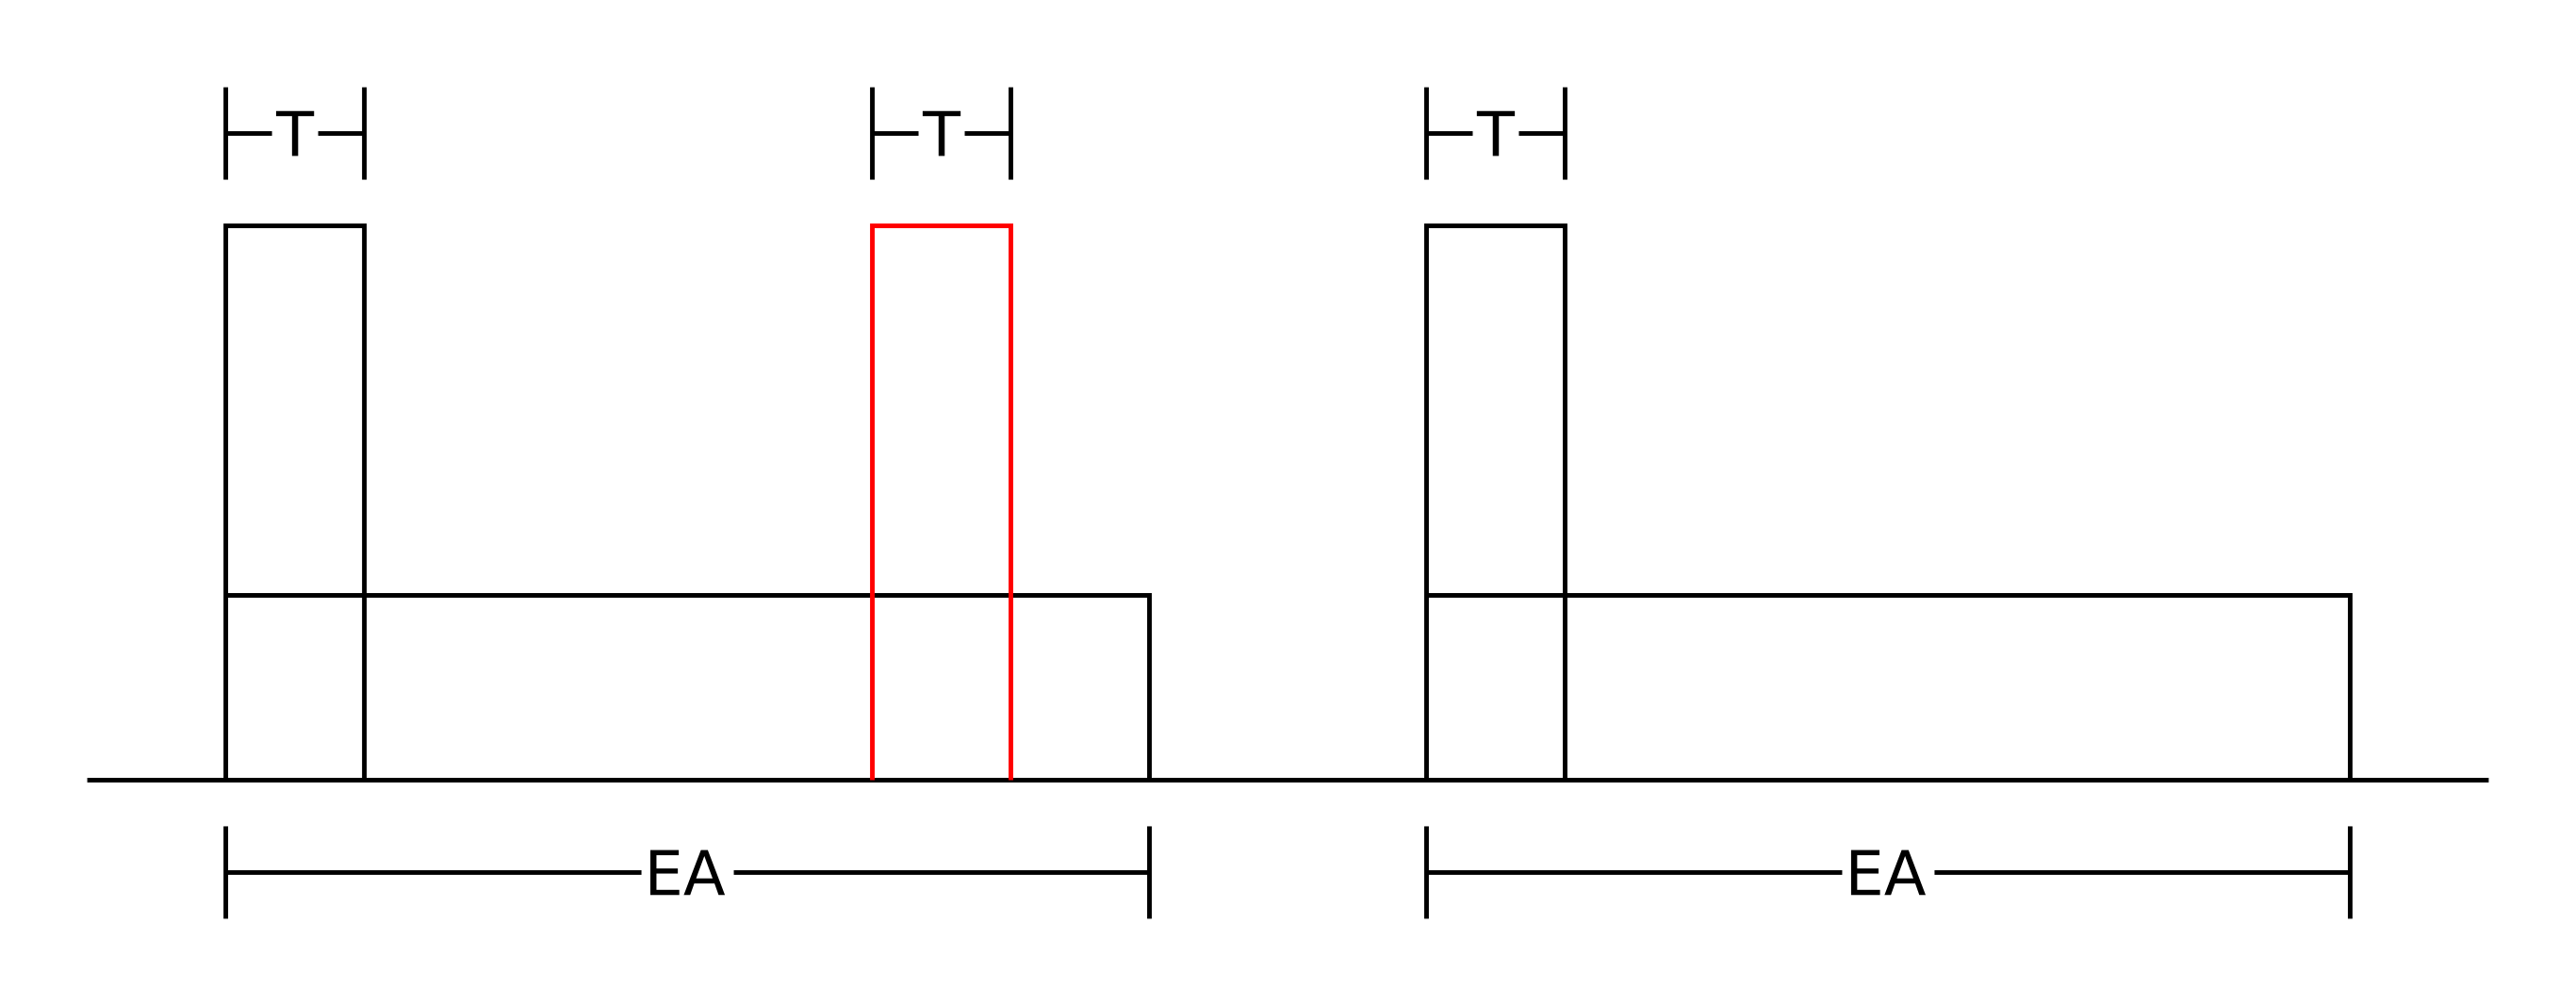
Figure 6 indicates a commonly misunderstood feature of external triggering. When a trigger is received during active exposure, the trigger will be ignored by the system, as indicated by the red trigger signal in Figure 6. Only until a trigger is received outside of an image capture will the next image begin exposing.
Figure 6 also shows the effect of having a shutter open delay of 0ms. As shown, the exposure begins immediately when the trigger is received. This indicates an External Low to High. An External High to Low would operate similarly, however the exposure would begin on the falling edge of the trigger pulse. This can be a useful configuration if the goal is to maximize framerate or emulate a mode similar to multiple of continuous capture, while maintaining external control of the system.
To maximize the frame rate with external triggering, there are a few settings that must be checked. First, assure that the shutter is permanently open to assure a shutter delay of 0ms (Controlled via Imaging Parameters / Camera). Additionally, assure that the trigger mode is set to External High to Low (Controlled via Imaging Parameters / Trigger). When these settings are confirmed to be set correctly, all that is necessary is to send a signal to pin 3 whenever pin 8 outputs a signal. With respect to Figure 6, this setup shifts the trigger signal to directly after EA ends such that the following exposure begins almost immediately after the prior.
This setup essentially emulates continuous frame grabs with the additional responsibility of controlling pin 3 with pin 8.
Figure 5. Shutter Open Delay
Figure 6. External Triggering

Shutter Delay

External Triggering
Kepler Rolling Shutter Overview

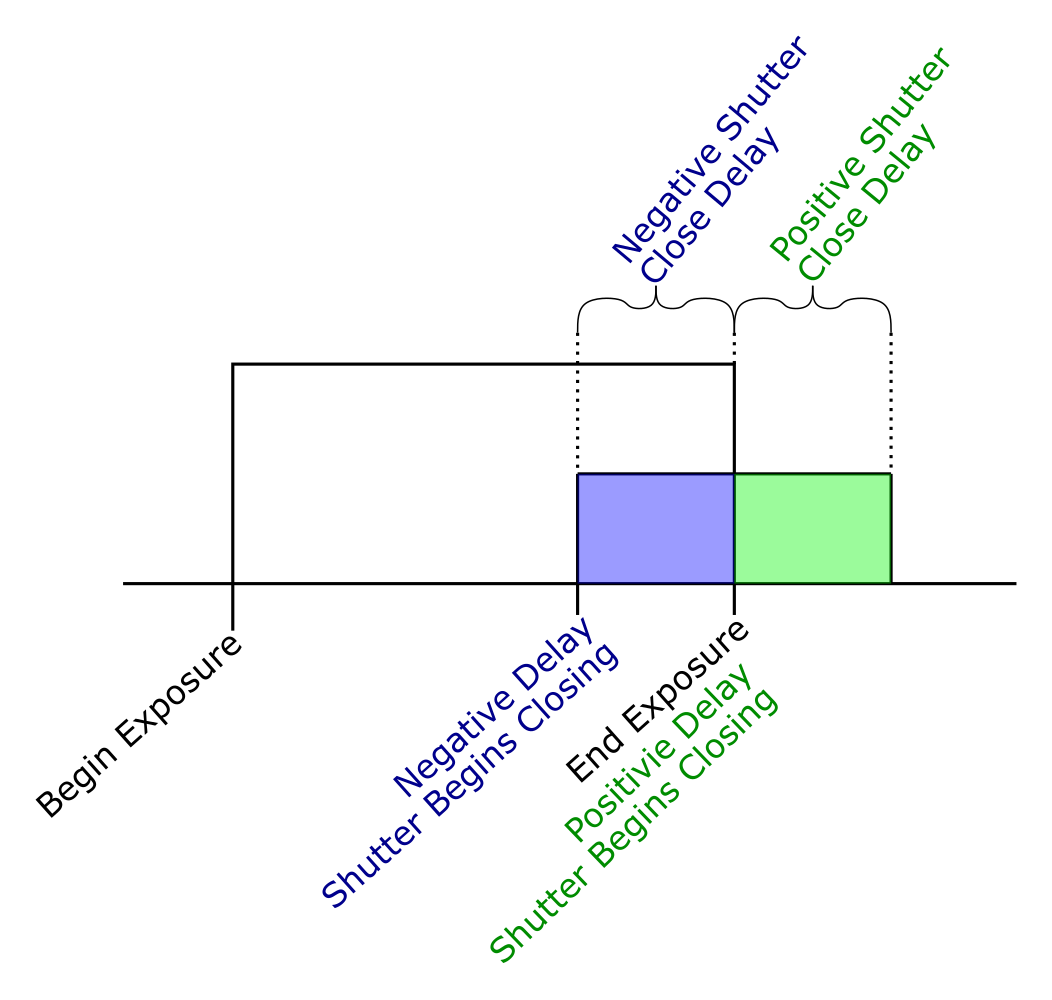
Figure 6. Shutter Close Delay