Customize the Display
Ways to alter the display:
• Switch control panel display layout
• Switch control panel side
• Change width of display areas
• Swap the image in the image areas
• Rotate or flip the displayed image
• View reference data with image
• Display one window rather than three windows
Control Panel Customization
The control panel can be customized by changing its layout, swapping which side the panel resides, and toggling buttons vs. drop down menus. More information is provided under Control Panel Customization.
Switch Image Positions
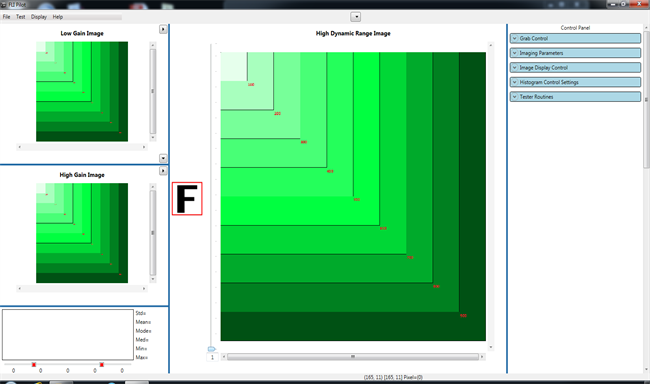
You can change which images are displayed in the three image panels.
By default the Kepler High Dynamic Range Image is displayed in the Main Image Panel, however, any of the three images can become the larger sized image.
• Use the Top Image Panel’s right-facing arrowhead to swap the Top Image Panel’s small image with the large image in the Main Image Panel.
• Use the Bottom Image Panel’s right facing arrowhead to swap images in the same way.
• Use the Top Image Panel’s down-facing arrowhead to swap the vertical position of the two small images (Top Image Panel and Bottom Image Panel).

Display Customization
Change Panel Widths
You can change the width of the panels relative to one another. Drag either of the two vertical blue lines that
separate the panels or either of the horizontal lines that separate the Top and Bottom Image Panels and the
Histogram Panel. The display below identifies the blue lines to use to modify the panel widths. To reset the panels
to the default widths, use the Display menu and select Reset.
Additionally, you can remove a panel from the display by dragging the vertical or horizontal line to the edge of the
display. If a panel was removed, simply use the blue line to pull the area back into view or use Display/Reset.
You can also opt to display only a single image and the histogram rather than three images. Refer to “Display
Review Status Bar Data
The FLIPilot Status Bar is located at the bottom of the screen is continuously updated. If connected, the status bar
displays camera information. When an image is opened or captured image and histogram information is
displayed.
The Status bar shows:
•Status/ Exposure Duration
•Coordinates (horizontal, vertical) and Value of pixel at mouse cursor
•Dimensions of the selected histogram
•MOS Base: Ambient / Base Temp. (°C) (Cooler duty cycle in %)
• Image Dimensions (width x height)

Use Image Zoom/Magnify Slider
An image with no magnification/zoom is identified as such by a “1” located in the numeric field just outside the
bottom left corner of the image. When zoomed, the orientation device is surrounded by a large red box to
represent the whole captured image is displayed.
Zoom in on the information in an image in three ways:
Place the mouse cursor in the image at the area you want to zoom, and scroll the mouse wheel. The
image zooms around the cursor.
Move the slide bar located on the left of the image. The image zooms around the center of the original
image.
Enter a numeric zoom value in the field on the lower left of the image. The image zooms around the
center of the original image. The zoom values are integers from 1 (default normal display) to 100.
You can unzoom the image using any one or a combination of the three ways used to zoom the image.
Once zoomed, you can reposition the zoomed image in one of two ways:
Use the vertical scroll bar on the right of the image and the horizontal scroll bar below the image to
translate the image up/down or right/left, respectively.
Press the left mouse button on the zoomed image to grab it then move the mouse in any direction.
The location of your zoomed view can quickly be determined by looking to the left of your main image at the F
indicator. The F represents your image while the red outline represents your field of view. Please see the
images below for representations of different zoom states.


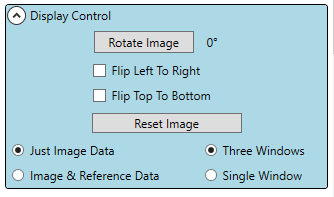
Display Control Functions
The Display Control panel gives the user further access to customization of
the FLIPilot display.
There is an option to rotate, flip, or reset the captured image, as well as
utilize reference data, and change the display type to single window instead
of three window.
To the left of the main image, a box with an F is displayed. This F shows the
orientation of the image, as well as the position of the image in relation to
the field of view displayed.
A proper explanation of the display control panel is under Control Panel

Finger Lakes Instrumentation, a division of IDEX Health & Science LLC
1250 Rochester St.
Lima, New York 14485
1250 Rochester St.
Lima, New York 14485
Phone: 585-624-3760
Email: IHSKeplerSupport@IdexCorp.com
Web: www.flicamera.com
Email: IHSKeplerSupport@IdexCorp.com
Web: www.flicamera.com
©2023 IDEX Health & Science LLC