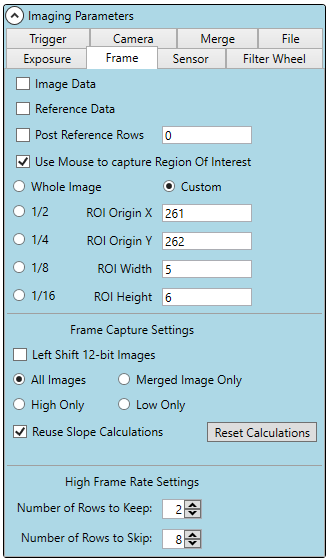
Frame Settings
Image Data
The image data describes the full size or region of interest. This checkbox must be selected to obtain image data.
Reference Data and Post Reference Rows
The imaging sensor can capture sensor non-illuminated pixel data that may be useful to review changes that might have occurred between the beginning and the end of a long exposure (drift) or through the image (full image). This information can then be used to improve image quality. You can display the captured images with or without the reference or post reference data overlaid on the image.
The sensor can output reference pixels at the end of every imaging data row. One pixel is generated for each colomn (of 256 pixels) on the sensor, so the reference data is eight pixels wide. The reference data appears as a black band on the right side of the image.
You can also enable the readout of an entered number of rows of data after the exposure. This post-reference data is shown at the bottom of the image.
Use Mouse to Capture Region of Interest and Whole Image
You can capture or view a subregion of the full image. Capturing a region of interest (ROI) has the benefits of
reducing trigger variability, increasing frame rate, and reducing image file size. This feature is very useful for
small objects such as plants and small galaxies that do not require the full field of view. Decreasing the number of
rows in the ROI increases the frame rate, however, decreasing the number of columns does not affect the frame
rate. It does, however, reduce the amount of data, thus reducing processing time.
A captured image has no magnification/zoom and is identified as such by a "1" located in the numeric field just
outside the bottom left corner of the image. In addition, the large red box around the letter "F" represents the
whole captured image that is displayed in the window.
Define a region of interest in one of two ways using the controls on the Imaging Parameters' Frame tab:
• When the “Use Mouse to capture Region Of Interest” checkbox is enabled (on Frame Control panel), place
the mouse cursor in the image, press the right mouse button and drag and draw a rectangle. The thin red
box on the image identifies the ROI and the Frame tab displays the coordinates and dimensions of the ROI.
• Enter integers into the Origin X and Y fields and into the Width and Height fields. The system displays a
thin red box on the image that correlates with the entered values.
After selecting or modifying an ROI, the software automatically recalculates the histogram to reflect the change.
To remove the ROI display and redisplay the whole image, select Whole Image on the Frame tab.
For precise region setting, one can either use the text boxes corresponding with origin x and y and width and
height.
For those looking for precision scaling or simply looking to reduce unused sensor area, select one of the
fractions. This option generates a ROI with that fraction of the whole imaging sensors pixels and centers the
region about the center point of the image.
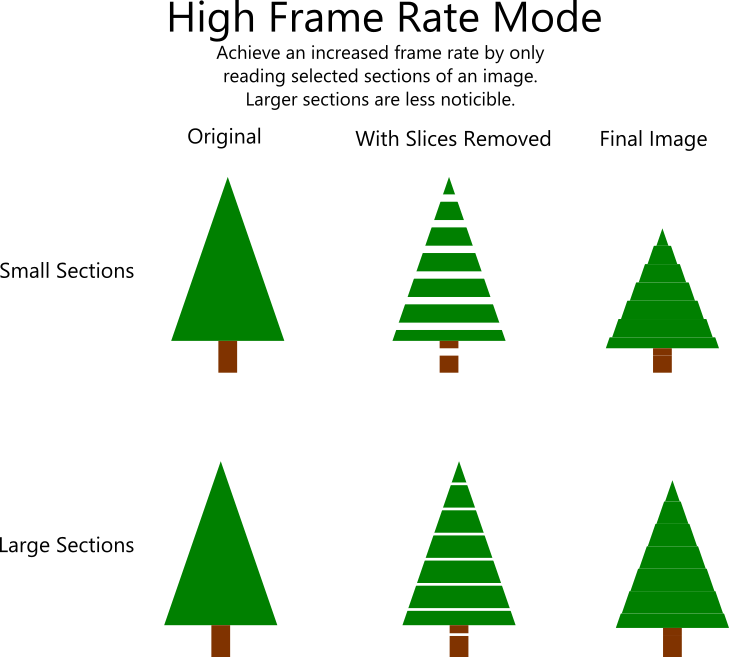
High Frame Rate Settings
Frame rate is in part determined by the amount of data that is read. By reducing the number of rows read, the overall frame rate is increased. High frame rate mode gives users the option to "skip" rows. Small skips are often insignificant in a final image and can reduce the data captured significantly.
Due to the behavior of sCMOS sensors, rows must be selected in pairs, or powers of two (2, 4, 6, 8, etc...). As examples, the system could be set to read every other pair of lines (keep two lines, skip two lines) or read 20 lines, skip 4 lines.
To use this feature, enter the number of rows to capture per block and the number of rows to skip between capture blocks in Frame Settings.
The figure to the right displays an example of high frame rate mode. The top image has larger skipped areas and smaller captured areas, resulting in the final image having minor issues. The bottom image has smaller skips and larger captured areas, resulting in the final image looking proper, while still reducing image size and increasing frame rate.
The default values of 0 will disable this mode.

Finger Lakes Instrumentation, a division of IDEX Health & Science
1250 Rochester St.
Lima, New York 14485
1250 Rochester St.
Lima, New York 14485
Phone: 585-624-3760
Email: IHSKeplerSupport@IdexCorp.com
Web: www.flicamera.com
Email: IHSKeplerSupport@IdexCorp.com
Web: www.flicamera.com
©2023 IDEX Health & Science